Table of Contents
- Why Turf on Concrete Works (and Where It Fails)
- What You’ll Need Before You Start
- Step 1: Prep and Test the Concrete Surface
- Step 2: Solve Artificial Turf Drainage on Concrete
- Step 3: Cut and Dry-Fit the Turf
- Step 4: How to Glue Artificial Grass to Concrete
- Step 5: Brush, Weight, and Cure the Install
- Cleaning Artificial Grass on a Patio in Midland, TX
- Frequently Asked Questions
Last Updated: October 19, 2026
Why Turf on Concrete Works (and Where It Fails)
Installing turf on concrete patio surfaces is one of the fastest ways to turn a bare slab into usable outdoor space. No demolition, no excavation, no waiting weeks for anything to grow. At Soco Turf Supply, we supply turf and installation materials for these exact projects across Midland and the surrounding Permian Basin, and the appeal is easy to see: a concrete patio is already flat, already stable, and already draining somewhere.
That last point is where most projects go wrong. Concrete holds water. Turf traps it. Put one on top of the other without a plan and you get standing water, loose seams, and a surface that smells after rain.
Below, we’ll walk through the full process step by step, including how to glue artificial grass to concrete so the edges stay put, and how to keep water moving off the slab.
The most common failure we see is skipping a drainage plan. Turf glued tight to a slab with no outlet turns a patio into a shallow pond after a heavy rain, and the backing stays wet for days.
What You’ll Need Before You Start
A successful patio install starts with the right gear on the ground before any turf gets unrolled. Concrete work has its own requirements, separate from a soil install.
Artificial Turf Installation Tools for a Patio Job
Most of the tools for artificial turf installation on concrete are simple and reusable:
- Tape measure and chalk line
- Utility knife with fresh blades
- Notched trowel for adhesive
- Stiff-bristle push broom
- Hand roller or weighted drum
- Moisture meter
- Power blower
- Knee pads and gloves
A moisture meter is the one tool people skip. It tells you whether the slab is dry enough for adhesive to bond. Skip it and the glue may fail within a season.
Materials Checklist
- Artificial turf cut to size, plus a small overlap
- Exterior-grade turf adhesive
- Seam tape if your layout needs joints
- Pressure-treated edge trim or border
- Landscape fabric for drainage channels
- Clean sand or infill, if your turf spec calls for it
Buy one extra blade for every 20 feet of cut. Dull blades fray the backing and leave a ragged edge that no amount of brushing will hide.
Step 1: Prep and Test the Concrete Surface
A clean, dry, slightly textured slab is the only surface adhesive will hold. Prep takes an afternoon and decides whether the whole job lasts.
Start by sweeping and blowing off every bit of grit. Then check for these issues:
- Oil or grease stains: scrub with a degreaser and rinse.
- Loose paint or coatings: remove them. Adhesive will bond to the coating, not the concrete.
- Cracks wider than a hairline: fill and let cure fully.
- Slick, sealed surfaces: scuff lightly so the glue has something to grip.
Next, test moisture. Tape a square of plastic sheeting to the slab overnight. If condensation forms underneath, the concrete is still releasing moisture and you should wait.
Step 2: Solve Artificial Turf Drainage on Concrete
Artificial turf drainage on concrete depends on giving water somewhere to go, because the slab itself won’t absorb a drop. Water has to run off the surface or through a channel you create.
Three approaches work:
- Slope check: confirm the slab already pitches toward a drain or edge. A level patio needs help.
- Drainage channels: cut shallow channels along the low edge and line them with gravel or fabric.
- Perforated backing: choose a turf with a backing that lets water pass, paired with a drainage path underneath.
If the patio is fully enclosed with no outlet, plan a border drain before you unroll anything. Retrofitting drainage after the glue sets means pulling up turf you just paid for.
Step 3: Cut and Dry-Fit the Turf
Dry-fitting is where you catch mistakes while they’re still free to fix. Unroll the turf on the slab and let it relax for a few hours, especially in warm weather, so it flattens before you cut.
Then work through this sequence:
- Rough-cut with a generous overlap on every edge.
- Align the turf grain so all pieces run the same direction.
- Check the pile direction against how people will walk onto the patio.
- Mark your final cut lines with chalk.
- Trim in small passes rather than one long slice.
Leave the turf in place overnight if you can. Any ripples that settle out on their own are ripples you don’t have to fight with adhesive.
Step 4: How to Glue Artificial Grass to Concrete
Gluing is the step that separates a patio install from a backyard one, and it’s where technique matters most. Adhesive replaces the nails and stakes you’d use on soil.
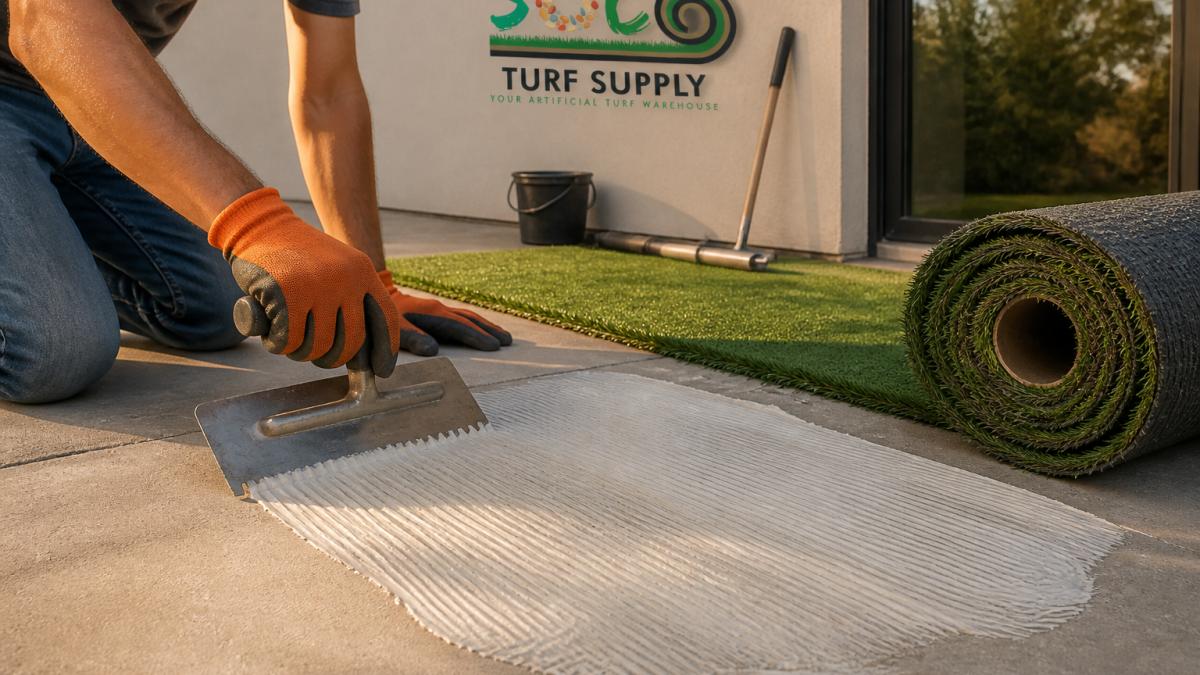
Fold the turf back from one edge. Apply exterior-grade turf adhesive to the concrete with a notched trowel, spreading it in even ribs. Press the turf down and work it flat with your hands or a roller.
Then repeat along the remaining edges and any seams. Weight the glued edges with sandbags or boards while the adhesive cures.
Don’t glue the entire field of turf to the slab. Glue the perimeter and seams, and let the middle float. A fully glued sheet has no room to expand in heat and will buckle.
Step 5: Brush, Weight, and Cure the Install
Brushing and curing turn a glued-down sheet into a finished surface. Let the adhesive cure per the manufacturer’s directions before any traffic, then brush against the grain to lift the pile.
Weight the edges for the full cure window. After that:
- Remove weights and brush the whole patio.
- Add infill if your turf spec calls for it.
- Trim any stray fibers at the border.
- Walk the perimeter and press down any lifted spots.
A common mistake is walking on the patio too soon. Foot traffic during cure shifts the turf and breaks the bond you just made.
Cleaning Artificial Grass on a Patio in Midland, TX
Cleaning artificial grass on a patio is mostly about dust, and in West Texas that means a lot of it. Blow or rinse the surface monthly, and spot-clean spills with mild soap and water.
For pet areas, rinse more often and use an enzyme cleaner on odors. Brush the pile after rinsing so fibers stand back up. If you need turf or installation materials for a patio project near me, our team at Soco Turf Supply can help you spec the right backing and adhesive for a concrete surface.
Here’s the short version of the whole job:
| Step | What You Do | Time Estimate |
|---|---|---|
| 1 | Clean and moisture-test the slab | 2-4 hours plus overnight test |
| 2 | Plan drainage channels | 1-2 hours |
| 3 | Cut and dry-fit the turf | 2-3 hours |
| 4 | Glue perimeter and seams | 2-3 hours |
| 5 | Brush, weight, and cure | 24-48 hours cure |
Frequently Asked Questions
Can you install artificial turf directly on a concrete patio?
Yes. Turf on concrete works when you prep the slab, manage water, and secure the edges. Clean the surface, patch cracks, and check that water drains away from the patio instead of pooling under the turf. A thin foam underlay adds cushion and lets water pass. Glue the perimeter and seams with exterior turf adhesive, then brush the pile upright. The result is a flat, low-maintenance surface that holds up to foot traffic and pet use.
What adhesive works for artificial turf on concrete?
Use a dedicated exterior artificial turf adhesive, typically a polyurethane or acrylic-based product made for outdoor use. Avoid general-purpose construction adhesive, which can fail under heat and moisture. Apply it with a notched trowel to the concrete, not the turf backing, so the bond grabs evenly. Press the turf down and weight it while it cures. Follow the label’s cure time before walking on the patio or placing furniture.
Does artificial turf on concrete need a drainage layer?
It depends on the slab. If the concrete slopes away from the house and water runs off, a thin perforated underlay is usually enough. If the patio is flat or holds water, add a drainage layer or drilled weep holes so water can escape. Artificial turf drainage on concrete fails when water has nowhere to go, which leads to standing moisture, odors in pet areas, and lifted seams. Test with a hose before you glue anything down.
How do you clean artificial grass on a patio?
Rinse the surface with a hose and let it drain. Remove leaves and debris with a leaf blower or stiff brush, then spot-clean spills with mild soap and water. For pet areas, rinse more often and use an enzyme cleaner made for artificial turf. Avoid pressure washing at high settings, which can loosen seams and mat the fibers. Brush the pile occasionally to keep it upright and prevent matting.
Concrete patios are unforgiving surfaces for turf, but they’re also the easiest to get right if you plan drainage and glue only where it belongs. Soco Turf Supply stocks UV-tested, performance-rated turf and the installation materials that go with it, with warehouse-direct pricing and guidance on every project. Get an estimate from our Midland team and start your patio install with materials that hold up.